
When wiring your dashboard, keep in mind that it vibrates quite a bit, even though it stiffens the fairing and windshield. All wire connections should be soldered, and adding a drop of epoxy for security wouldn't be a bad idea. On the original BCE Works bike dash, the vibration caused a lead to break off of a resistor, so pot all loose components in epoxy as well.
For easier installation/removal of the dash in the future, use a Molex-type electrical connector between the dashboard and the bike. Nine circuits should be adequate, but connectors are available with up to twelve. Connectors are available with a locking latch, like OEM auto and motorcycle connectors.
Switches should be water-resistant. I originally used mini rocker switches with silicone boots on my dashboard, but grit got in from the underside of the switches and rendered some of them intermittant. I have found that mini toggle switches from Radio Shack are a much better alternative, with rubber boots over the switch levers. These can handle a fair amount of current, and don't take up much space.

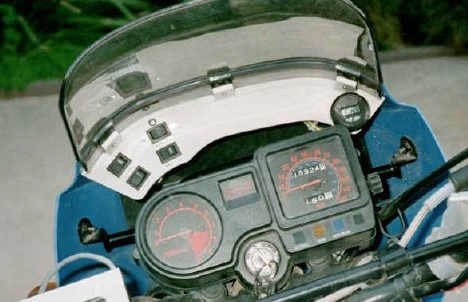
Above is the current version of the mini dash on the Big Cee works bike. On the left is a Radio Shack weather-resistant FM radio. The radio is normally powered by an AA battery, but this one is powered by the bike, through an LM317T adjustable voltage regulator. By soldering the wires and control resistors directly to the regulator leads, I kept the package small enough to fit in the radio's battery compartment, and ran the power cable out the upper left corner. The radio is attached to the dashboard with double-sided foam tape. Directly underneath the radio, on the underside of the dash, is a 1-watt per channel stereo amplifier. The amp was built from a kit: Kits-R-Us number 87, which runs around $10 or less (PC board and components). It is intended for 9V max operation, so I used another LM317T to drop the voltage.

The amplifier is connected to the 1/8" stereo headphone jacks on the right side of the dash. The upper one is input, and the lower one is output. To connect the radio, I use a 1/8" male-male cord, and run it across the front of the fairing. The radio uses the headphone cord as an antenna, so it is helpful to have some extra cord connected. I am trying to work out a small antenna as well. Having the amp input connected through a jack also allows me to use it for a disc or cassette player. In my helmet, I use Radio Shack 16-ohm speakers. These are very thin and 100% plastic, so they can handle helmet conditions. With the amplifier, they are loud enough to hear through earplugs. In fact, they are difficult to use without earplugs, as the volume control is very sensitive through the amp. The sound quality isn't the greatest, as you'd expect through earplugs, but it is plenty to keep you company on long stretches of road. I'm still looking for speakers that can handle more power, but not weigh a ton.
To the right of the radio are five control switches. An amber LED on the left illuminates them at night; I'm not too happy with that part, but it works. From left to right, the switches control my offroad lights, marker lights, cooling fan bypass, rollchart lighting, and amplifier. The switches are Radio Shack mini toggles with silicone boots, and the indicators are Radio Shack 12V LED assemblies. (I wanted a blue LED for the aux lights, to match the high beam indicator, and had to use a straight LED there.) The aux light switch is center off; the up position turns the lights on, and the down position turns them on with the high beam.
Sources: